벌써 Claude Code로 만든 앱이 스토어에 세 개나 릴리즈 됐다. 동작에는 문제가 없지만 셋 다 UI 디자인이 아쉽다. 네 번째 앱은 날씨 앱으로 정하고 UI 디자인에 요즘 핫한 구글 Stitch를 이용해 봤다.
https://stitch.withgoogle.com/
Stitch - Design with AI
Stitch generates UIs for mobile and web applications, making design ideation fast and easy.
stitch.withgoogle.com
구글 Stitch를 이용해서 UI 디자인 뽑아내기
Stitch 사이트에 접속해서 대화창에 간단한 프롬프트를 던졌다.

알아서 간단하면서도 고급스러운 디자인을 뽑아 달라고 했다. 마치 뜨거운 아이스 아메리카노 같은 요청을 했는데 얼추 괜찮은 결과물이 세 가지 버전으로 출력됐다.
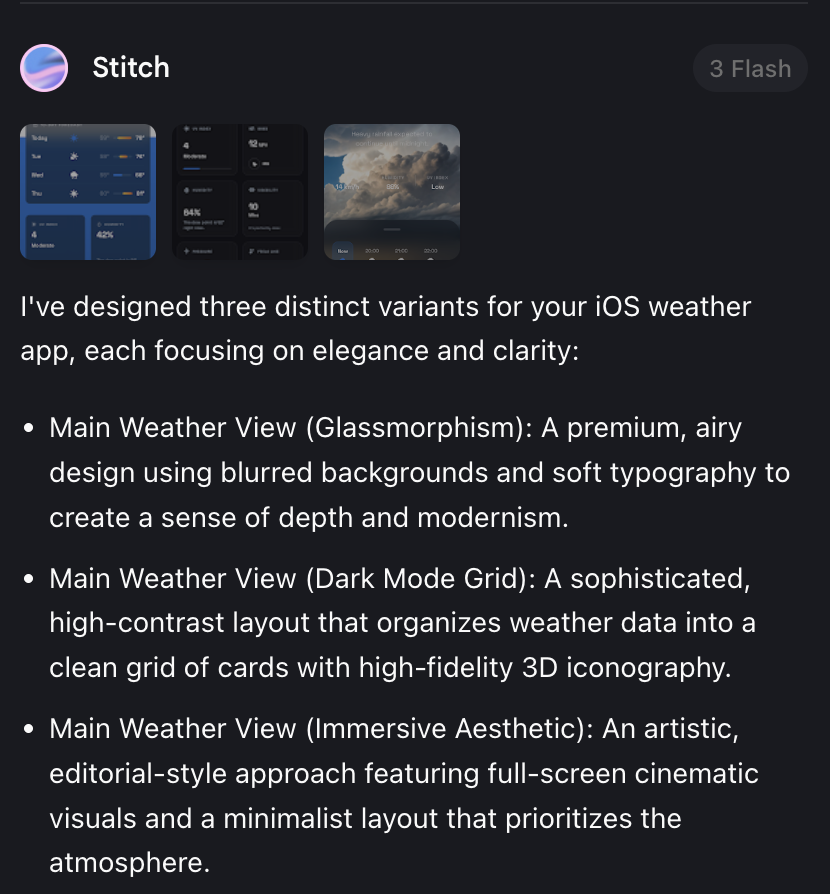
Glassmorphism, Dark Mode Grid, Immersive Aesthetic 이렇게 세 가지인데 첫 번째 Glassmorphism 스타일이 그나마 괜찮아 보여서 선택하고 다음 단계로 넘어갔다. 지금 글을 쓰면서 뒤늦게 찾아보니 Glassmorphism은 '반투명 재질을 사용하여 다른 요소 간의 시각적 계층을 표현하는 그래픽 스타일'이라고 한다.
https://brunch.co.kr/@ggk234/27
Glassmorphism에 관하여
글래스모피즘의 장점과 설계 방식의 이해 | 최근 오랜만에 마이크로소프트에서 Windows10의 차기 버전인 Windows11을 발표하였습니다. 이번 디자인에 가장 큰 변화는 바로 Glassmorphsim 스타일의 적용이
brunch.co.kr
다음부터는 첫 프롬프트에 elegant, gorgeous 같은 뻔한 단어 쓰지 말고, (Glassmorphism 같이) 원하는 스타일에 해당하는 단어를 넣어야겠다. 이렇게 하면 stitch가 여러 스타일의 버전을 뽑아내고, 나는 또 그중에서 하나를 선택하는 단계를 줄일 수 있으니까.
서너 번의 프롬프트 핑퐁을 거쳐서 나온 결과물이다. 썩 만족스럽진 않지만 stitch를 사용한 첫 시도인 것 치고는 나쁘지 않아서 그대로 claude code에 던져줬다. 지금 생각해 보니 결과물로 나온 html 코드를 이미지와 함께 전달했다면 claude에서 더 좋은 결과물이 나왔을 듯하다. 이 글을 다 쓰고 한 번 해봐야겠다.
Claude Code를 이용한 iOS 날씨 앱, MVP 구현
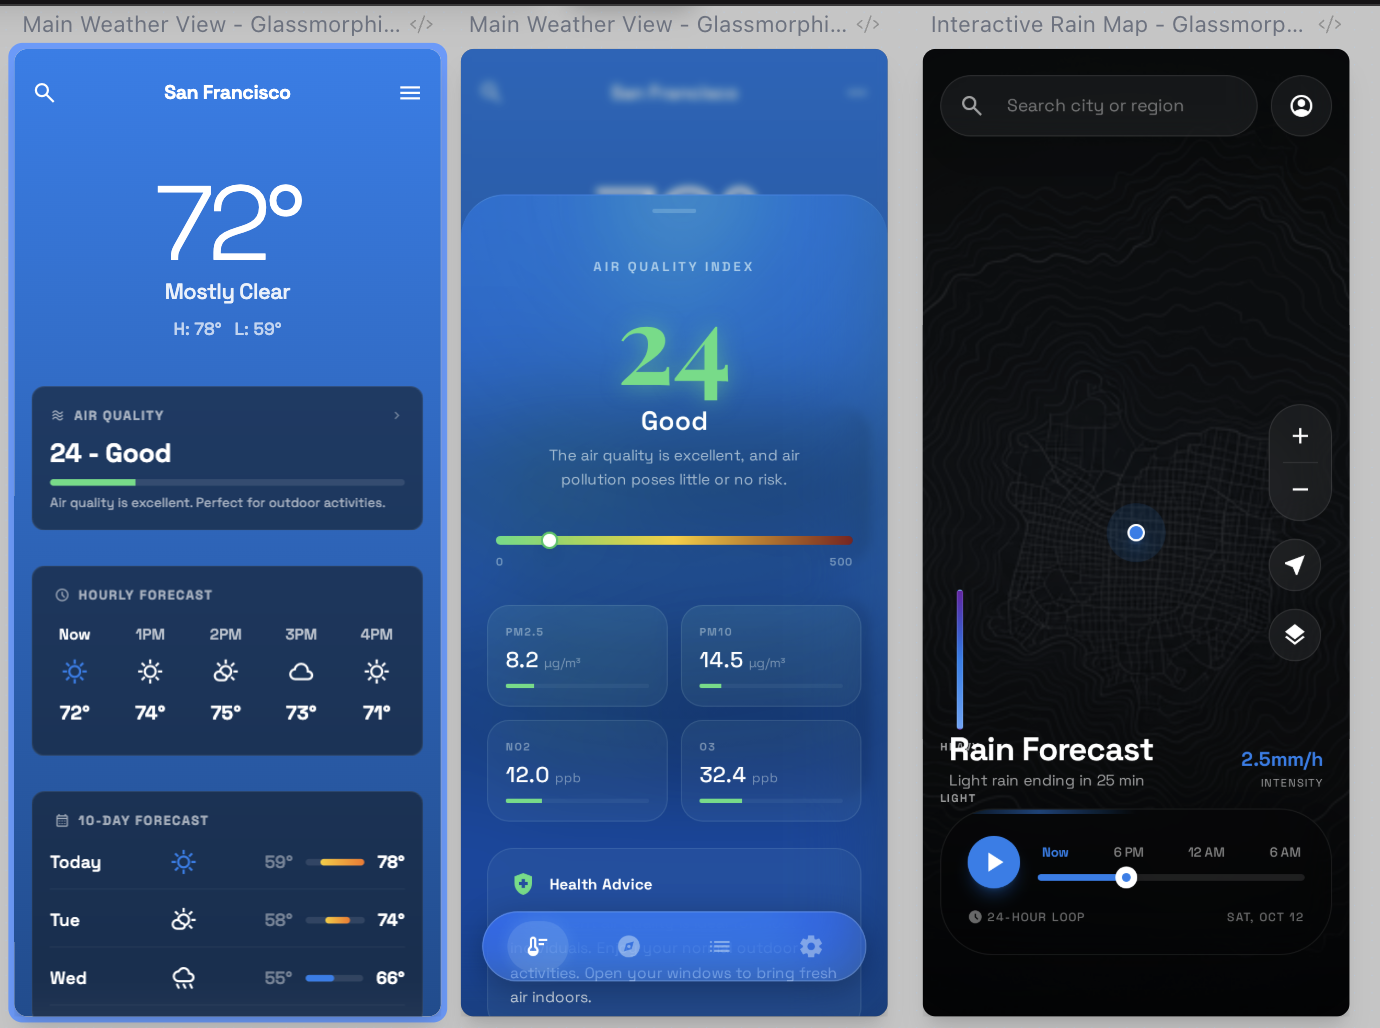
cluade code에 stitch로 생성한 여섯 장의 화면 구성 UI 이미지를 첨부하고, 이어서 아래와 같이 프롬프트를 썼다.
Design the UI/UX based on the attached image and create a fully functional iOS weather app using WeatherKit.
There are four menus that allow navigation to four different sections as follows.
* Main Weather View
- A premium, airy design using blurred backgrounds and soft typography to create a sense of depth and
modernism.
- interactive rain map
- Features a full-bleed topographic map with a vibrant, translucent rain intensity overlay and a floating
glassmorphic playback bar for forecasting.
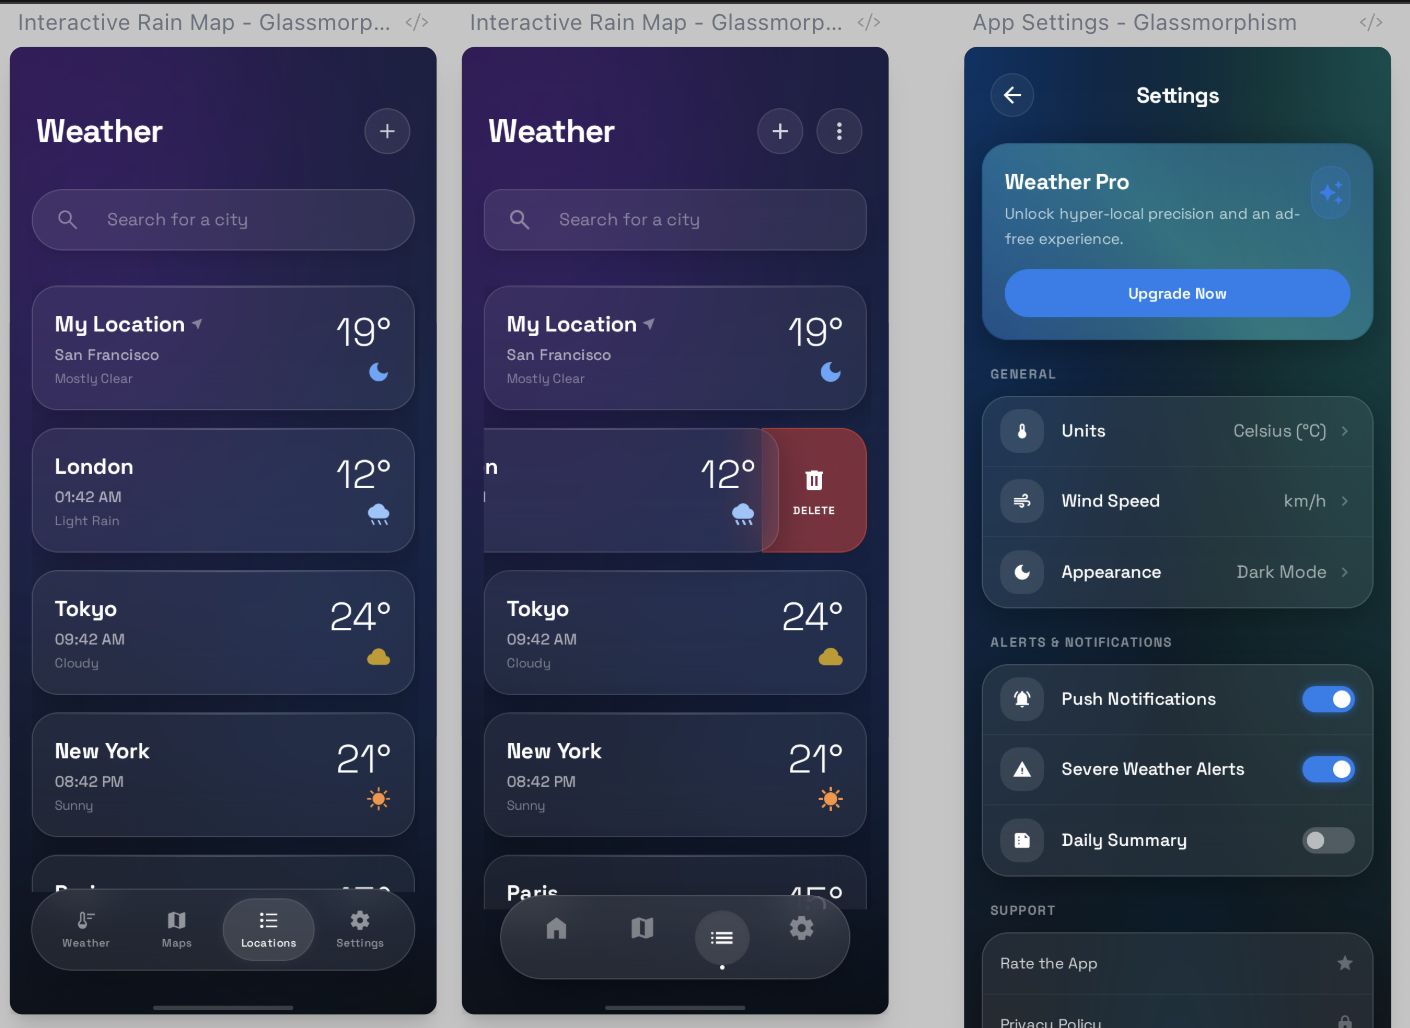
- Locations Management Screen
- Features a vertical list of saved cities displayed as elegant, translucent glass cards against a soft
twilight gradient, complete with a frosted glass search bar and a floating action button for adding new
locations.
- 'swipe to delete' interaction to the location cards
- App Settings
- Features organized groups of options within translucent frosted glass sections, sleek glossy toggles,
and a premium "Weather Pro" banner, all set against a soft ethereal gradient background.
⎿ [Image #1]
⎿ [Image #2]
⎿ [Image #3]
⎿ [Image #4]
⎿ [Image #5]
⎿ [Image #6]앱에 대한 간단한 설명(위의 두 줄)을 빼고, 나머지 프롬프트는 stitch가 생성한 이미지와 함께 출력된 설명 문구를 그대로 가져다 썼다. 지금 보니 옮기면서 실수로 Glassmorphism라는 문구를 빼먹었다. 텍스트의 각 항목 간 depth도 엉망이다. 그래서 claude code의 결과물이 stitch 이미지와 좀 다른가 보다. 다음부터는 텍스트까지 그대로 가져다 쓰더라도 좀 더 신경 써서 옮겨야겠다.
WeatherKit에서 제공하지 않는 AQI(대기 질 지수) 정보 획득
  Options for AQI data:
  1. OpenWeatherMap Air Pollution API - Free tier (1000 calls/day), provides PM2.5, PM10, NO2, O3
  2. BreezoMeter API - Same source as Apple's Weather app, but requires paid subscription
  3. IQAir API - Free tier available
  4. Skip AQI feature - Focus on weather-only features
claude가 plan 모드로 열심히 구현 계획을 수립하다 갑자기 멈추고, 나에게 위와 같은 질문을 던졌다. AQI는 air quality index의 약자로 '대기질 지수'를 의미한다. 나도 몰랐는데 날씨 앱을 만들면서 알게 됐다. 당연히 애플에서 제공하는 날씨 서비스이자 API인 WeatherKit에서 제공하는 것을 쓰면 될 것 같은데 왜 다른 서비스를 사용하려고 하는지 의아했다. 사실 WeatherKit이라는 것도 이번에 처음 접했다. 이런 무지한 상태로도 몇 시간 만에 잘 동작하는 날씨 앱을 몇 시간 만에 만들어 낼 수 있다니 놀라울 따름이다.
https://developer.apple.com/weatherkit/
WeatherKit - Apple Developer
WeatherKit brings valuable weather information to your apps and services through a wide range of data that can help people stay up to date, safe, and prepared.
developer.apple.com
다시 claude의 질문으로 돌아가서.. 4지 선다 답안 중 고르지 않고 아래와 같이 claude에게 역으로 질문했다.
Can't you using WeatherKit to implemnet AQI?내 질문에 대해 claude가 한참 고민과 검색을 수행하더니 아래와 같은 답변이 돌아왔다.
⏺ Let me verify the current WeatherKit capabilities regarding air quality data.

⏺ plugin:context7:context7 - resolve-library-id (MCP)(libraryName: "WeatherKit", query: "WeatherKit air quality AQI PM2.5 pollution data iOS")
  ⎿  Available Libraries:
     Each result includes:
     … +29 lines (ctrl+o to expand)
  ⎿  Running PostToolUse hook…

⏺ Web Search("WeatherKit iOS air quality AQI data 2025 2026 Apple developer")
  ⎿  Did 1 search in 23s
  ⎿  Running PostToolUse hook…

⏺ Unfortunately, WeatherKit does NOT provide Air Quality (AQI) data to third-party developers. According to Apple Developer Forums:
  "Neither air quality index nor pollen count is available to developers through WeatherKit."
  Apple's own Weather app displays AQI data sourced from BreezoMeter, but this data is not exposed through the WeatherKit API.
자기가 열심히 찾아봤는데 WeatherKit이 AQI를 제공하지 않는단다. MVP 구현인데 시간을 더 쓰고 싶지 않아서 claude가 제공한 첫 번째 선택지인 OpenWeatherMap의 Air Pollution API를 사용하기로 했다. 위에서 claude가 WeatherKit 관련 문서를 검색하는 데에 사용한 context7이라는 MCP에 대해 잠깐 언급하고 넘어가겠다.
Claude Code에 context7 MCP 설치 및 활용
Context7 - Up-to-date documentation for LLMs and AI code editors
Generate context with up-to-date documentation for LLMs and AI code editors
context7.com
context7은 claude, chatGPT 같은 LLM 서비스에 최신 버전의 문서를 동적으로 제공하는 MCP 서버다. context7가 설치됐다는 것만으로 WeatherKit이 AQI 정보를 제공하지 않는다는 cladue의 답변 신뢰도는 매우 높아진다. LLM 학습 당시의 과거 정보나 꾸며낸 말이 아닌, 애플의 최신 개발 문서가 답변의 근거이기 때문이다. MCP 서버가 뭔지 설명하는 건 이 포스트의 글을 너무 벗어나는 것 같아 따로 쓰지 않는다. 사실 잘 설명할 자신도 없다. 아무튼 Claude Desktop에는 진작에 설치해서 잘 사용하고 있었는데 Claude Code에 설치하는 건 차일피일 미루다 이번에 설치했다.

Cluade Code에 MCP 서버를 설치하는 방법이 여럿 있는데 나는 Plugin으로 설치했다. Claude Code Plugin에 대한 자세한 설명은 아래 글을 참고하시기 바란다.
https://claude.com/blog/claude-code-plugins
Customize Claude Code with plugins | Claude
Claude Code now supports plugins: custom collections of slash commands, agents, MCP servers, and hooks that install with a single command. Share your Claude Code setup with plugins Slash commands, agents, MCP servers, and hooks are all extension points you
claude.com
설치 방법을 간단히 설명하자면.. 먼저 아래와 같이 Context7 plugin이 포함된 마켓플레이스를 설치해야 한다.
/plugin marketplace add anthropics/claude-plugins-official이어서 아래와 같이 해당 마켓플레이스로부터 Context7 plugin을 설치한다.
/plugin install context7@claude-plugins-official
위와 같이 설치가 완료된 것을 확인할 수 있다. 나는 context7을 포함해서 네 개의 plugin을 설치해서 사용 중이다. frontend-design plugin은 이 글을 쓰는 도중에 설치했다.
간단한 iOS 날씨 앱 구현 및 동작 확인
이후 구현은 accept edits 모드로 claude code가 쭉 진행했기 때문에 따로 언급할 부분이 없다. 다만 진행 중에 세션의 잔여 Context가 쭉쭉 떨어져서 auto-compact가 발동될 위기가 있었다. 다행히 33%에서 작업이 완료됐다.

이전에 만든 앱들에 비해 구조가 복잡한 앱이라 그런 듯하다. 이제는 서브에이전트(subagent)를 이용해서 세션을 여러 개 띄우고 병렬로 작업하는 것을 고려할 때가 됐나 보다. 현재 위치한 지역의 날씨 정보를 표시하는 기능, 지역을 추가해서 리스트로 관리하는 기능, 화씨/섭씨 변경 기능 등 날씨 앱의 핵심 기능이 잘 동작하는 준수한 결과물이 나왔다. 물론 바로 출시할 수 있는 수준은 아니다.
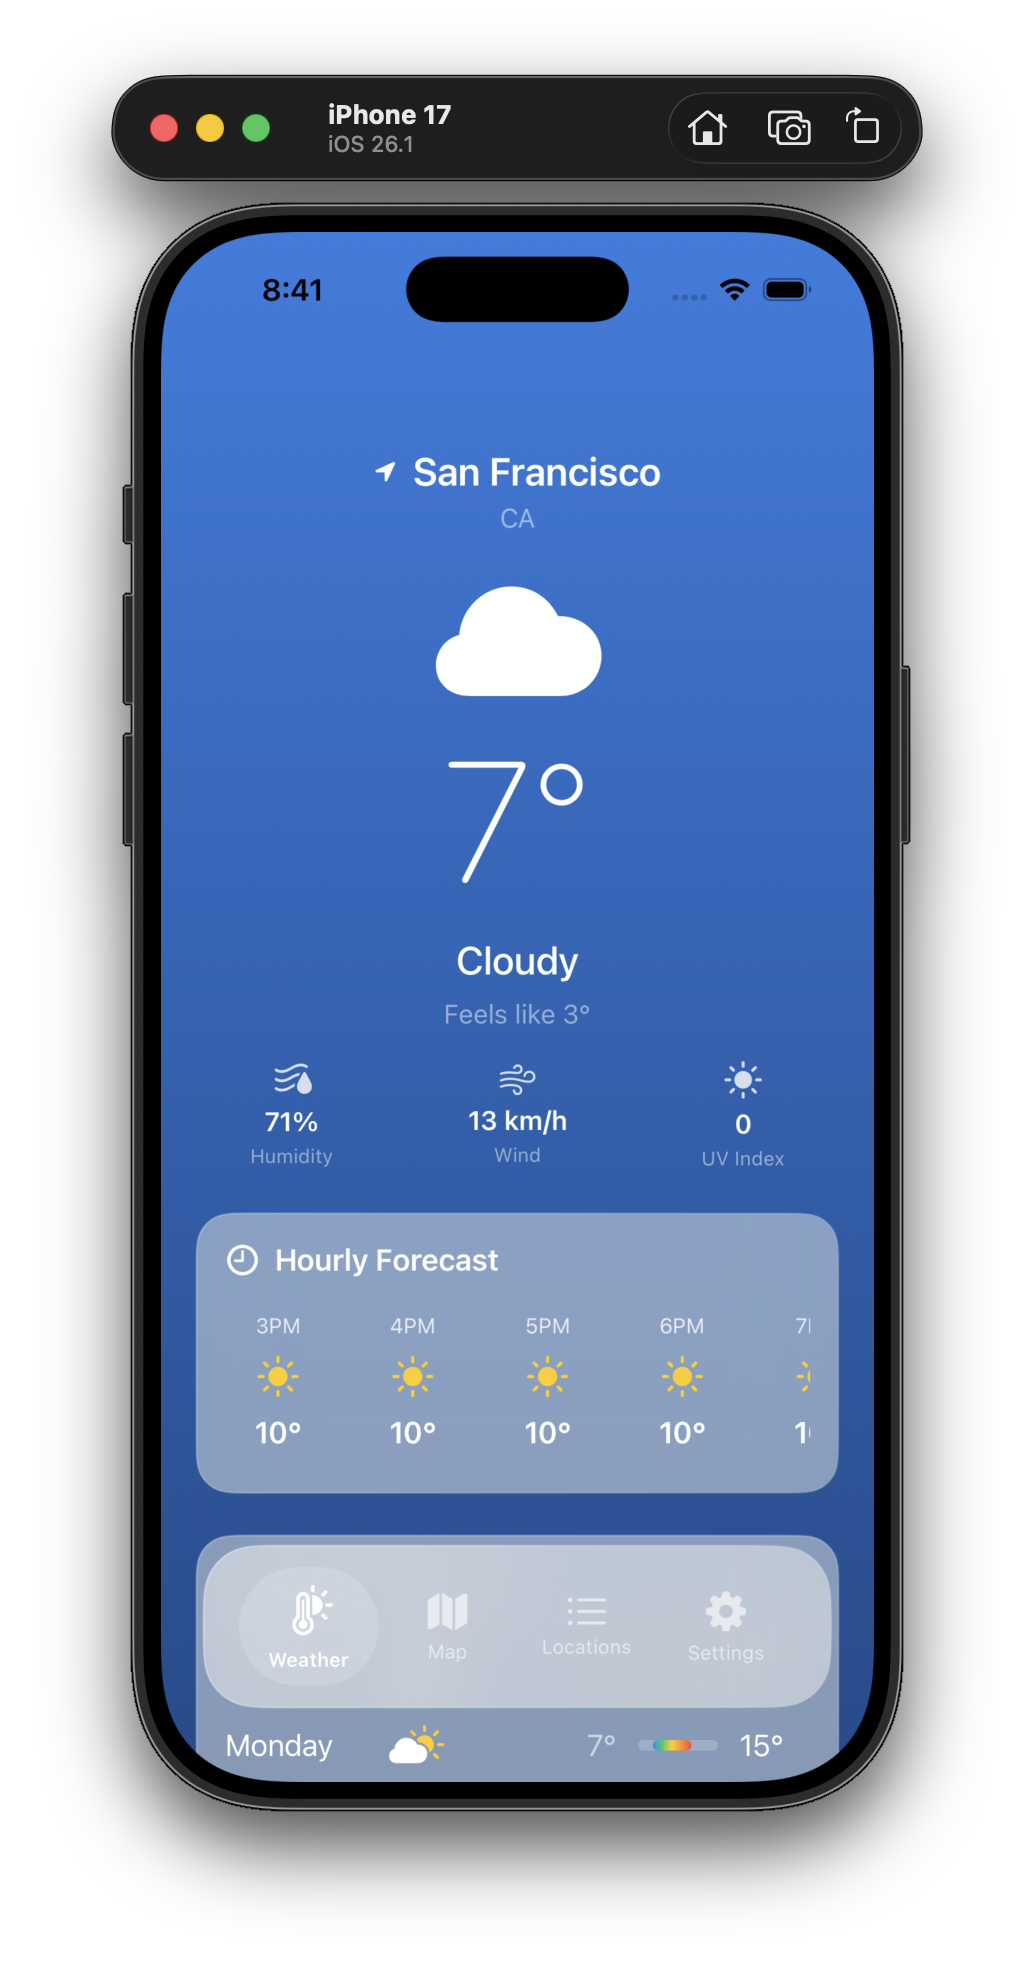

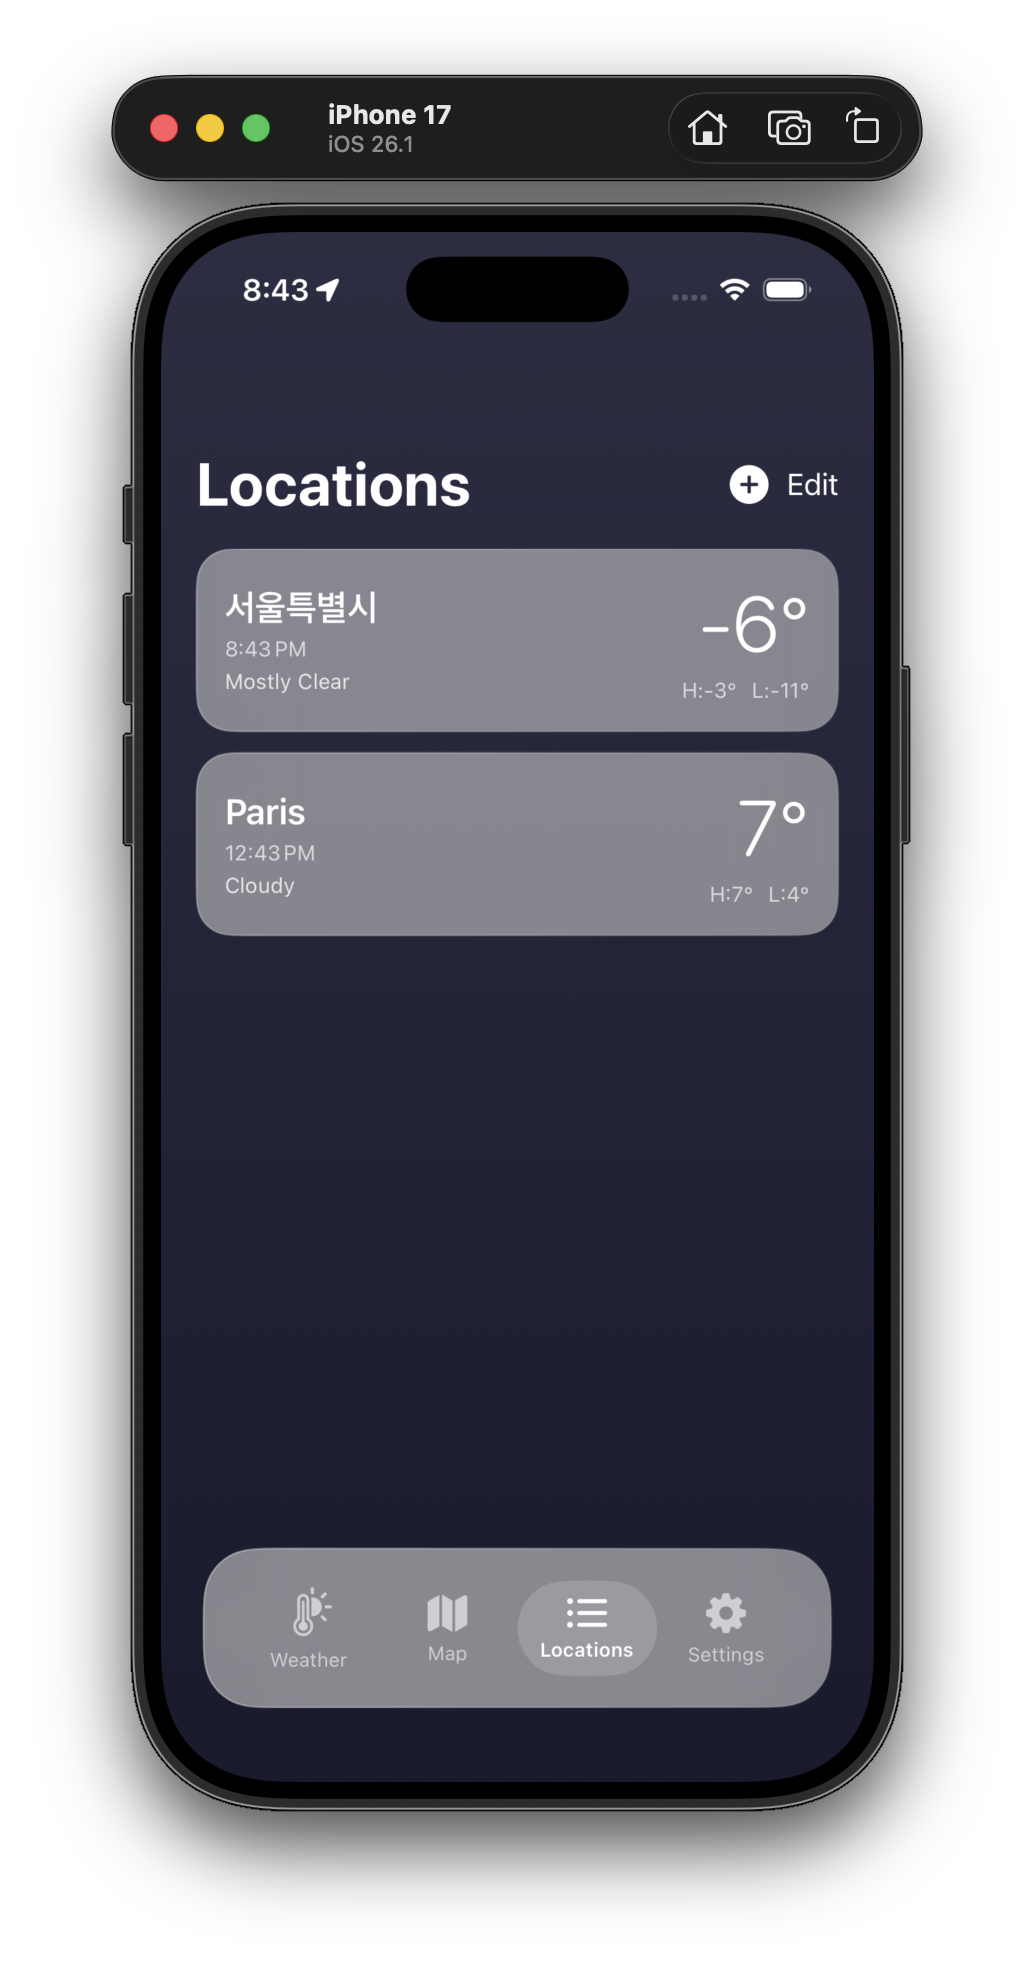

시뮬레이터에서 찍은 스크린샷을 올렸는데 실 기기에서도 잘 동작한다. 하지만 보시다시피 stitch로 뽑은 UI 디자인과는 차이가 꽤 많이 난다. 글 첫머리에 언급한 대로 Glassmorphism 스타일을 명시하고, claude에 이미지와 함께 html 코드도 전달해서 다시 작업해 봐야겠다.
WeatherKit Capability 활성화, Provisioning Profile 생성
물론 아무 문제 없이 구현이 한 번에 끝난 건 아니다. 코드 구현 문제가 아닌 인증서 관련 문제로 앱이 제대로 동작하지 않았던 상황이 있었다. 이를 간단히 정리해서 공유한다. 구현 완료 후 바로 실행해 봤는데 시 아무리 기다려도 '로딩 중..' 문구가 사라지지 않고, 위치 및 날씨 정보가 표시되지 않았다.

Xcode 콘솔 창을 보니 아래와 같은 에러 로그가 찍혀 있었다.
Encountered an error when fetching weather data subset; location=<+37.78583400,-122.40641700> +/- 5.00m (speed -1.00 mps /
  course -1.00) @ 1/24/26, 3:31:13 PM Korean Standard Time, error=WeatherDaemon.WDSJWTAuthenticatorServiceProxy.Errors 0
  WeatherDaemon.WDSJWTAuthenticatorServiceProxy.Errors.xpcConnectionFailed(Error Domain=NSCocoaErrorDomain Code=4097 "connection
  to service named com.apple.weatherkit.authservice" UserInfo={NSDebugDescription=connection to service named
  com.apple.weatherkit.authservice})
이러면 안 되지만 읽어 보기도 귀찮아서 그대로 긁어서 claude code 터미널에 던졌다.
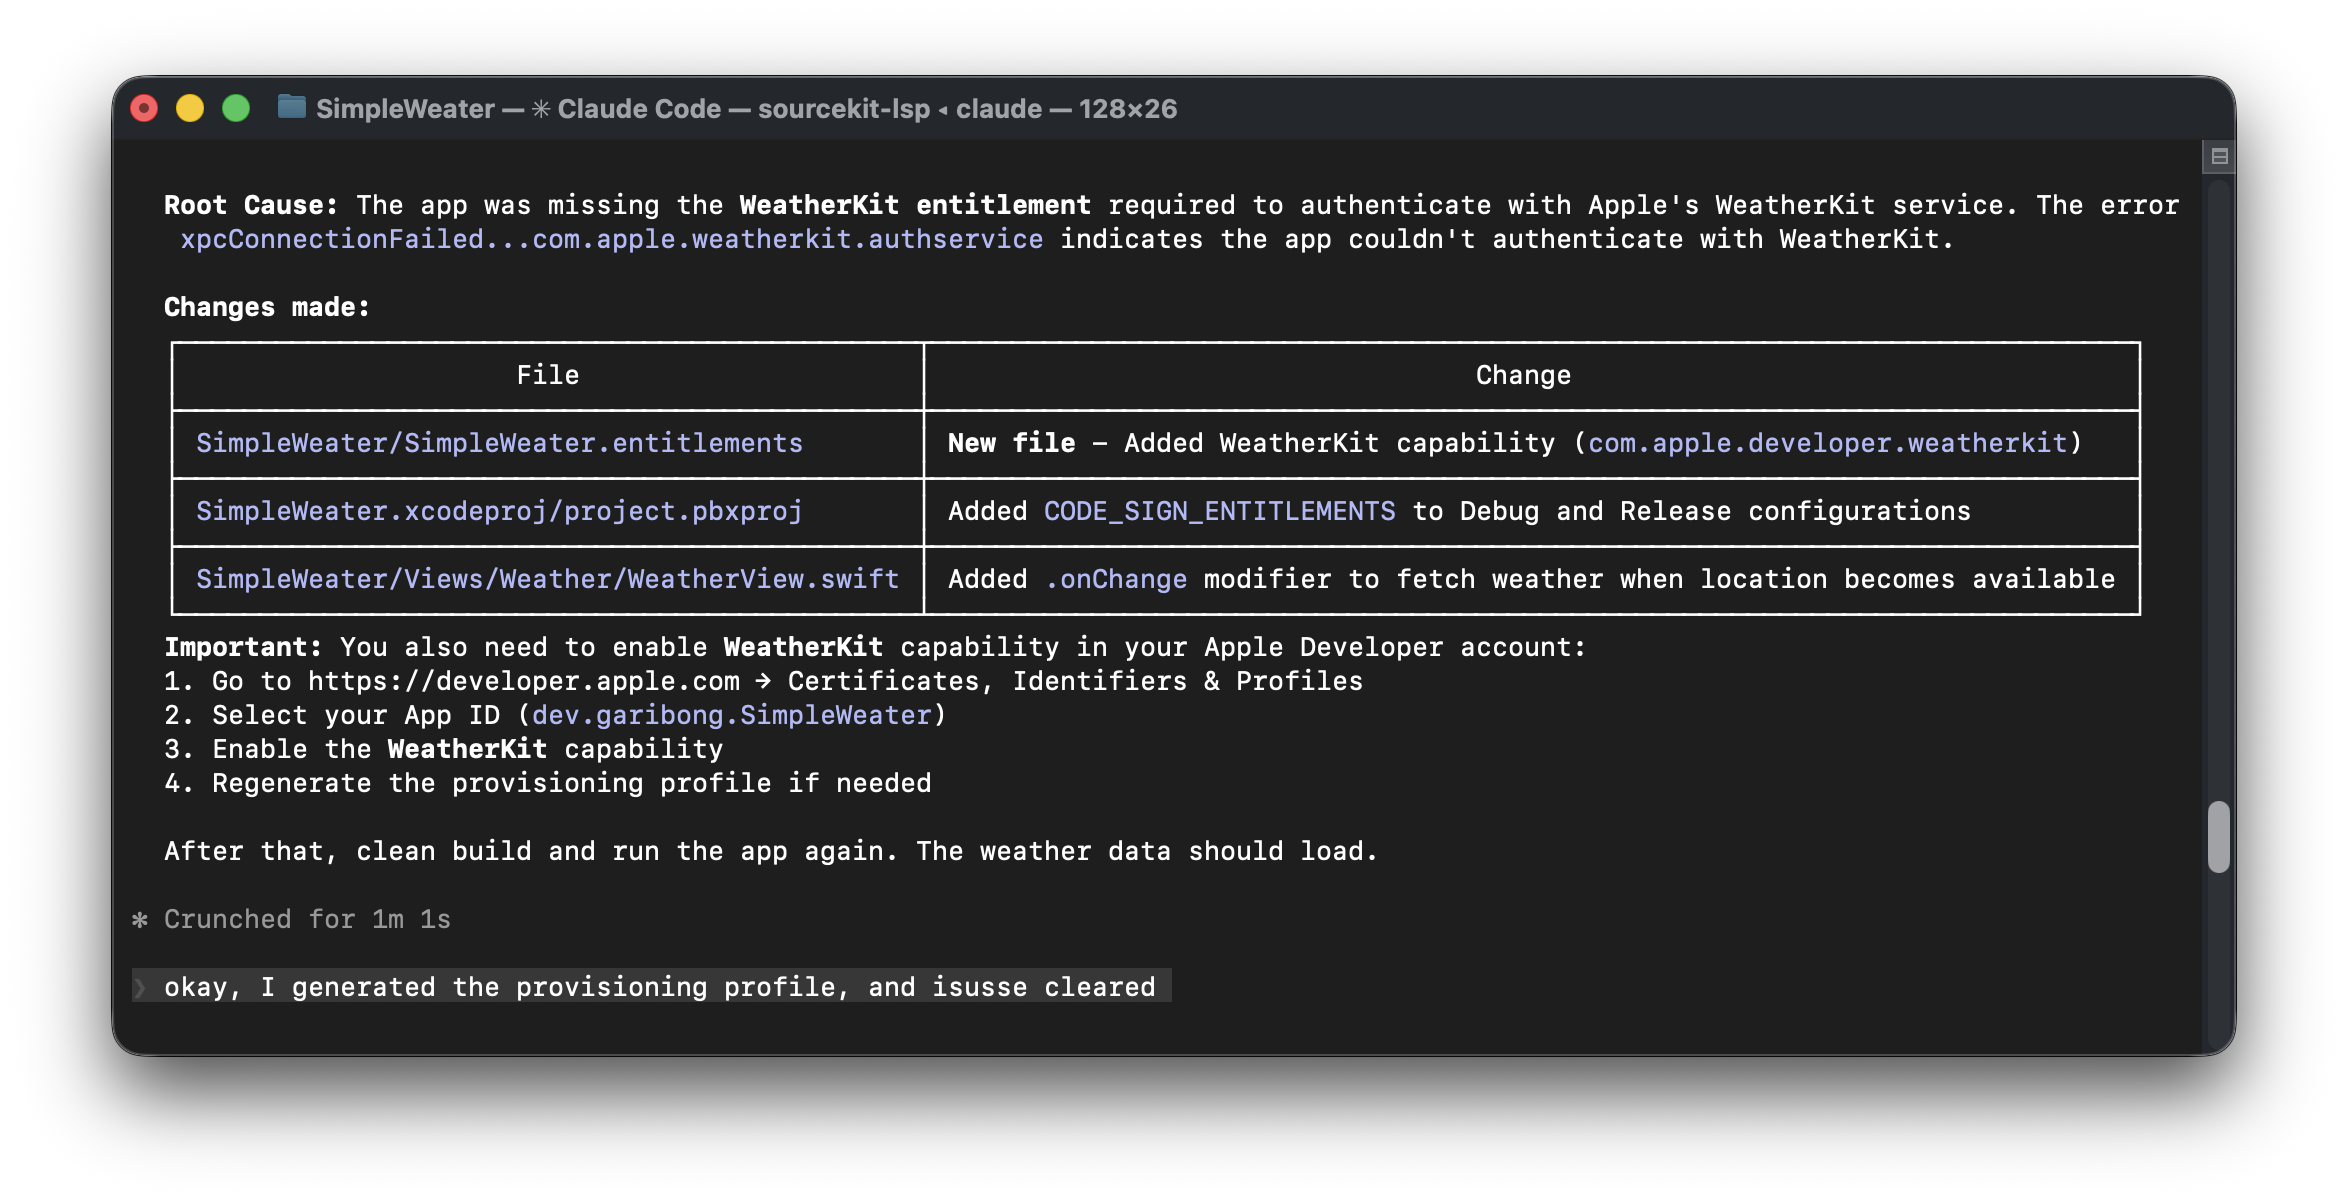
Provisioning Profile에 WeatherKit Capability를 활성화해서 재생성하라는 답이 바로 나왔다. 사실 귀찮아서 아예 Provisioning Profile 없이 구현 작업을 시작했다. claude code한테는 비밀이다. WeatherKit Capability를 체크하고 Provisioning Profile을 생성해서 프로젝트에 적용했더니 오류가 해결됐다.

끝.
'개발 일지 > 기타 작업' 카테고리의 다른 글
| Apple Developer Program 조직 멤버십 전환 #4: 앱스토어 개발자 이름 변경 (0) | 2026.01.27 |
|---|---|
| Apple Developer Program 조직 멤버십 전환 #3: 세금ID 오류 해결 (0) | 2026.01.27 |
| Apple Developer Program 조직 멤버십 전환 #2: D-U-N-S 번호 발급 이후 (2) | 2026.01.17 |
| Claude Code - 커스텀 status line 설정하기 (4) | 2026.01.13 |
| 앱 수익화를 위한 Google AdMob 연동 #3 - 앱 인증 완료, 광고 단위 추가 (0) | 2026.01.05 |


